Social media buttons provide an easy way for your visitors to show that they appreciate your blog and share this with their friends. When used properly, these buttons can also increase traffic to your website. In this article, we will learn how to use Blogger's HTML/JavaScript gadget to add social media buttons to our blog.
You may already have some icons belonging to social media sites that appear after your posts, these are "share" buttons which lets the user to share that article with friends. The buttons that we will add are not going to be about a single article, but rather the whole blog. Namely, we will add a Facebook "Like" button, a Google+ "+1" button and a Twitter "Tweet" button. We note that there are other buttons, such as "Follow" buttons or buttons specific to a social media site. Here are step by step instructions for adding these buttons to your blog:
- On your blog's dashboard, go to the section called "Layout":
- Here, choose the "Add a Gadget" option where you want your buttons to appear:
- Next, choose the "HTML/JavaScript" gadget from the menu:
- For the title, you can enter something like "Find Us on Social Media" or simply leave the title empty. I think the buttons are pretty self explanatory, so I will leave it empty. For the "Content" section, enter the following:
- At this point, the add gadget window looks something like:
- Keep the add gadget window open. We move on to adding the code for the buttons. For the Facebook like button, go to https://developers.facebook.com/docs/reference/plugins/like/ and scroll down to the section called "Configurator":
- Enter your blog's address on the section that reads "URL to Like". Uncheck "Send Button" and "Show Faces" options. For "Layout Style", choose "box_count" and for width, enter "45". Now, click the "Get Code" button. You might be asked to log in to Facebook if you are not already logged in. Afterwards, a dialogue box will pop up. Here, choose the "IFRAME" option:
- Copy the code and paste it between the first "<td></td>" tags in the add gadget window. Find where it says height="65" in this code and change it to read height="62". Find where it says height:65px and change this to height:62px as well. The "Content" section of the add gadget window will now read (with your address instead of mine, of course):
For those who are not very familiar with HTML tables, adding this code between the first "<td></td>" tags makes the Facebook button appear first. If you want this button to be in the middle, place it between the second set of "<td></td>" tags and if you want it to appear last, place it between the last "<td></td>" tags.
- Next, we add a "+1" button from Google+. Go to https://developers.google.com/+/web/+1button/:
- For size, choose "tall". For annotation, choose "bubble". Next, expand the "Advanced options" section and enter the address of your blog to the last section, which is "URL to +1":
- Now, on the right hand side where it says "Look good? Copy the code.", copy the line that starts with "<div class=..." and paste it between the second set of "<td></td>" in the add gadget window. Copy the rest of the code starting from "<script type=..." and paste it after "</table>" tag in the add gadget window. After these, the "Content" section of the add gadget window looks like:
- Finally, we add a "Tweet" button from Twitter. Visit https://twitter.com/about/resources/buttons. Choose the "Share a link" button:
- Enter the address to your blog where it says "Share URL". Make sure that the "Show count" option is checked and "Large button" option is not checked. Copy the code that appears to the right and paste it between the last "<td></td>" tags in the add gadget window. Next, in this last piece of code that you pasted, find where it says data-url="(your blog's address)" and right next to it, write data-count="vertical". After this, the contents of your gadget should look like below:
- Click "Save" on the add gadget window:
- On the layout window, move the "HTML/JavaScript" gadget to wherever you want the buttons to appear:
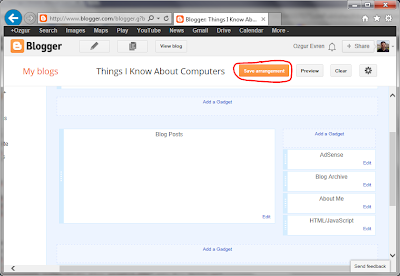
- When you are happy with the buttons' location, click the "Save arrangement" button:
- Your social media buttons are ready:


This comment has been removed by a blog administrator.
ReplyDelete